|
| To the curb |
I spotted a Chinese style table outside an apartment building where the underground woodshop is located. It caught my eye because it had all the marks of a handmade table seemingly abandoned at curbside. I sent a message to the woodshop chief whether he thought it was abandoned and I received no response back from him. Surely, this table was valuable to somebody, even as a source of solid hardwood. I examined it discreetly, upclose and I discovered that it was broken, a splintering at the mortise hole intersections, but a clean break that lent itself to a practical repair. I sent a message to my wife along with a photograph. She asserted that it was set out to be carted away, but I kept thinking that if that were true, why had it not already be picked up by any of the ragpickers who dive into trash barrels for a strip of cardboard or any other opportunistic salvagers who frequent constructions sites? I was reluctant to simply haul away the table myself, dreading the approach of a counterclaimant or sensing a new kind of scam that I had not yet anticipated. Without any reaction from residents, my wife and I together carried the hefty piece through parking structure to a safer location. I was already anticipating using this table as a teaching aid: first by explaining repair techniques but also showing how preindustrial furniture demonstrated varying degrees of surface preparation. It seemed like this piece might have fallen from the sky to help advance my teaching agenda. I left the table there underground on high hopes.
I returned a few days later during a rainstorm and after beginning to recover from a summer cold. Predictably there were puddles in the low spots of parking spaces 003 and 004. The water likely trickles down through gaps between the apartment tower perimeter and the parking structure roof. Some of my pieces had been moved out of the standing water before I arrived. I busied myself with attending to the other pieces still getting wet feet. Before I had time to focus any attention on the table, I had to mop away the excess rainwater into the drains running the full length of the outside wall. I repositioned a floor fan to help dry up the area. I was then turning my attention to another ongoing project when I noticed the sawdust outline of a footprint on the tabletop. Looking more astutely, I noticed another pair of footprints. I walked around to the other side of the table and looked again at the break in the tableleg. Seeing that it had gotten much worse, I created the scene in my mind as to what had happened during my absence. Somebody, probably the woodshop chief, had climbed atop the table to adjust the airvents of the skylights; the broken table leg, then gave out, further damaging the fractured joints. Then in order to cover up his mistake, he jammed the broken leg sections back together quickly, crushing the splintered fibers together and creating an even wider fracture.
 |
| Compacted with manure |
Surveying this compounded damage, I recalled a lecture from some years ago given by a large animal veterinarian. She related the story of an anxious dairy farmer with a milchcow that developed a simple leg fracture. The farmer though, against her advice coaxed his cow to walk on the broken leg out of the barn into a trailer in order to transport the animal to her clinic. The audience gasped as she continued this account, empathizing with the increasing trauma of the injured animal and reluctantly predicting how badly the story would end. She described how the original, simple fracture would have been easily repairable and readily done so if the farmer had not panicked and kept the cow immobilised and calm until she could have arrived on site. I looked at that mangled mess of crushed fibers and recalled the same visceral reaction when hearing the veterinarian mention seeing exposed bone marrow piercing the hide and "compacted with manure." The best that she could do was to quickly put the animal down. It would have been prohibitively expensive to do otherwise, and with no guarantees of recovery. I wasn't going to put a bullet through this table, but I recognized that my options for it had been reduced and the success of a repair had been sharply compromised. I could still get most of the layout information that I needed from the broken leg and I had three nearly identical legs to compare with it.
 |
| Scene from the conservation lab |
I decided that due to the compounded damage and limitations caused by the original joinery, repairing the original leg with a patch was conclusively out of the question. I needed to visit the local woodmerchants' to find stock for a replacement and ask them for help in identifying the wood species. I showed a familiar merchant the upper section and he appeared unimpressed, either due to the banality of a foreigner buying wood from him or the frequency of seeing such broken furniture samples. He readily identified the wood as
柳桉. This is either according to
Wikipedia, Parashorea spp. , a
wood genus that is distributed across southern Asia and IndoChina. He said that he imports it from Malaysia; or according to the Chinese
Baidu Baike, it is Eucalyptus saligna, an Australian wood that is plantation grown.
The merchant had some in his inventory but in dimensions much larger than what I needed, and apparently, what he was willing to sell me. I freely admit to knowing little about Asian lumber species, but I was quick to recognize what he proposed I use.
I could see that it was a spacer for a shipping bundle with a shallow dado cut along its length to accommodate poly banding. It was damaged (this wood is intended to be sacrificial.) on one end and had blackened checking on the other. It was also encrusted with tar and grit. I looked askance at it but I could see that it was white ash by eye. I didn't quite understand whether I was being dismissed as an annoyance or that they were being helpful with their offer. The piece was oversized but just barely. I asked whether they had another similar piece of wood and I was presented with a similar sacrificial piece of shipping material but in Populus spp. I resigned that I could do no better so I paid 10 RMB, a token amount for the two pieces and took my leave.
I didn't yet feel completely defeated but it did seem as though unseen, sinister forces of the Universe were trying to persuade me to give up on this project. I got the bits of lumber to the woodshop and respectfully set aside the piece of Poplar for another day. I scraped as much of the driveway grit and tar off the stock before setting about bringing it to match the dimensions of the original leg. It became evident that this ash (Fraxinus americana) with its traces of blue stain fungus had most likely succumbed to
emerald ash borer. It had stood dying or dead before being logged and processed into lumber after which it was shipped back to Asia whence its insect assassin had been similarly exported in a scrap of untreated packing material.
 |
| Replacement stock with a history |
I wasn't going to let the symmetry of this biological exchange fully determine my conservation efforts if the wood wouldn't serve its necessary purpose. I planed and jointed the the wood down to 63 mm sq. I could sneak in a new piece along the length, avoiding forklift damage at the top but including a dark surface check at the bottom that was very superficial. I wasn't, however, able to plane out the groove for the industrial banding. It would be oriented to the interior and I therefore concluded that I would use this piece since it accorded with the spirit of the original workman's preindustrial mindset and the defect would serve as a subtle reminder of the transPacific exchange that extended this table's utility.
 |
| Laying out a new leg up to loss |
Although it should have been expected, it still came as a surprise to recognize that this table is held together entirely by friction in its joints: no glue, wedges, nor pegs. I surmised that this piece was built in the tradition of HongMu but for a lower status individual unable to afford the denser tropical hardwood species that distinguish such construction. By my estimate three species of wood went into this assembly: the legs and skirt assemblies, the outer rails of the tabletop, and the tabletop center.
I've never been a big fan of high end Chinese woodworking, essentially HongMu. There is a revival lately due to the growing wealth accumulated by the Chinese middleclass. I find much of the elaborate carving offputting, a kind of small scale Baroque effect, and in woods of questionable provenance. I approached this project as an opportunity to challenge some of my prejudices in this regard.
 |
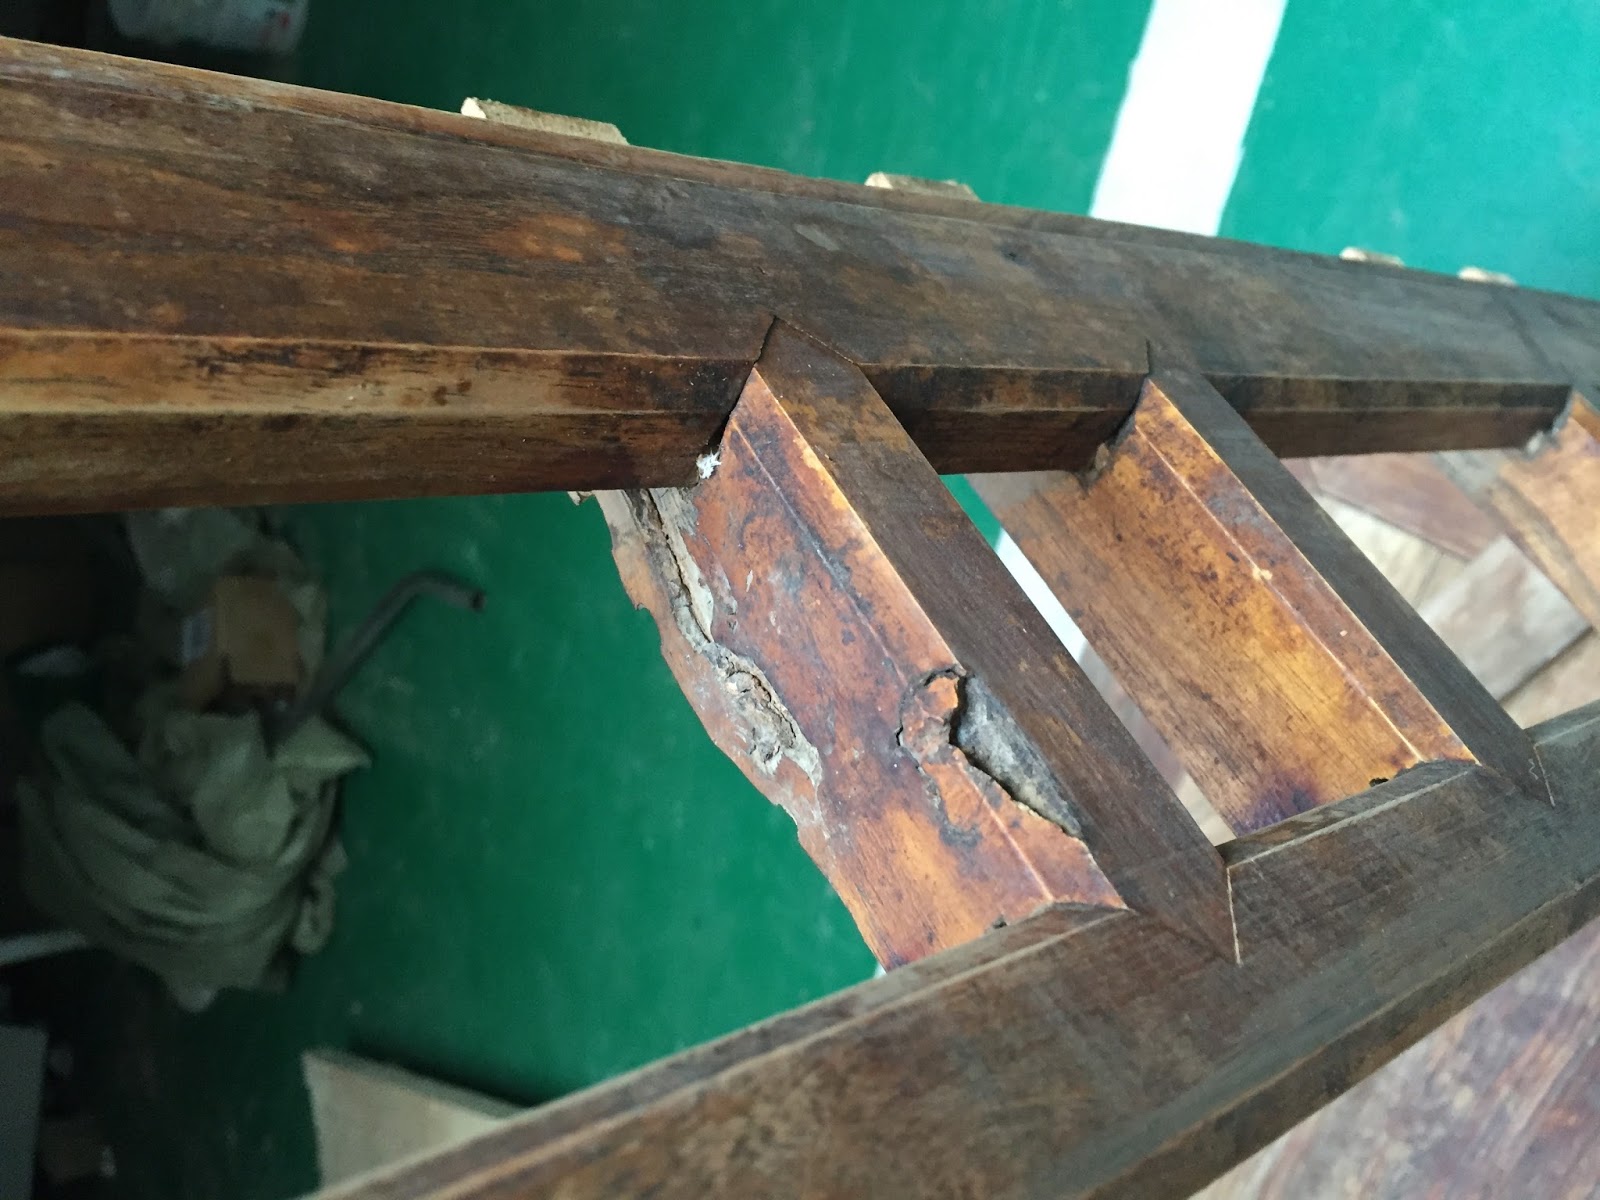
| Interior of upper break |
 |
| Break in lower leg section |
The broken leg seemed to confirm my low regard for the standard Chinese joinery. Looking inside the break made it evident as to how much of the fibers were severed fully across the leg to allow for the the throughtenons. These tenons exited the leg at half the size that they entered to allow for overlap, coming out at about 15mm sq. This is just one perplexing aspect of Chinese joinery. In particular, the threewaymiter joint is purportedly made in order to hide end grain but requires throughtenons to allow for enough friction to hold the joint together.
The skirt segments that connect the legs are composed of three parts: an upper register, a lower register, and vertical tenon elements. The upper and lower register are unifed by a set of 4 vertical elements mortised by throughtenons into the lower register with spearpoints and which pierce the narrower upper register, using sliding dovetail the ends of which become stub tenons which are inserted into the skirt of the tabletop.
 |
| Tenons keyed with sliding dovetails into upper register |
 |
| Throughtenons viewed from below |
The effect of this construction method seems to be to lighten the skirt and to lower the intersection of the throughtenons away from the end grain of the top of the legs. The ends of the upper register are inserted into the top of the legs with mitered open mortise. This might carry some of the weight of the tabletop but I shall show later that the tabletop is so thick that it doesn't need such support. The upper register does nothing to pull in the joint between the skirt and legs together.
 |
| Open mortises viewed from above |
 |
| Tenons of upper register |
I was lucky to have a mortise chisel of a size to allow me to chop an open mortise into the new leg. Being an open mortise, it's very fast and easy to chop out. Matching the miters at the corners mainly serves to complicate this joint. As I write I still must do some fettling on one side before setting down the tabletop which locks up all the other pieces.
 |
| Appropriately sized mortise chisel |
 |
| Tenon with curious air gap |
I wanted to understand why the lower corners the tenons had been cut off to such a degree. The bottoms of the tenons didn't necessitate such a severe shortening and chopping the bottoms of this style of mortise is easy to do. I thought I might understand after redoing the joint myself. I have no explanation.
Laying out and chopping the throughmortises of the new leg was straightforward and direct. Because it's handy in the woodshop, I used a mortising machine to waste out of the majority of the wood, paring down to the lines by hand. I've regarded the spearpoint detail as needless decoration that severs long fibers, weakening structural members without concern for function. I discovered that not as much of the long fibers had been severed, at least, in this example. In order to lessen the negative effect of this details, the workman created what I call a rising spearpoint detail. One purpose for this detail is to allow for a smooth intersection of chamfers at 90 degrees. the thickness of the chamfer determines the thickness of the spearpoint, which then rise up to point in order to allow some material to remain intact in the leg, strengthening the junction more than I was aware possible.
 |
| the rising spearpoint detail |
 |
| Intersection of spearpoint and chamfer |
Despite this attention to detail. it behooves me to mention just how much of the leg is chopped away in order to produce a "flushed style" table. While the leg starts out at 63 mm square, the mortises for the upper register reduce the leg's dimensions to 50mm sq, which must also function to contain tenons that secure the mitered corners of the tabletop, and which, I shall show, is the ultimate weakness to this construction method. The size of the tenons are determine as half the thickness of the lower register, about 31 mm. The throughmortises reduce the leg down to a solid dimension of only 35mm sq.
 |
| The leg core: dimension 35mm sq |
The leg on this table broke off at the section line where the lower mortise cuts through the mass of the leg. The outer fiber of the legs don't offer significant strength since it is compromised by the throughmortises and the spearpoint details. And yet this is not even the main flaw of this design.
The tabletop, potentially the simplest element of a table, is in this example even more complicated in its construction than the base. The outer frame is beefy 38mm thick that is a frame and panel construction with mitered corners, allowing for a large expanse of pegged inner boards to float within its framework. The inner table slats are only 15mm thick and supported by halflapped cross members which are also mortised into the outside frame.
The corner tips contain an open mortise to receive a corresponding tenon from the mating member; the miter is a butt joint. The 'bread board ends' are not pegged as one would expect in western style construction methods. The tabletop instead relies on friction fit, but notably the tenons rising from the skirt and mostly from the legs to hold the mitered corners tight.
 |
| Tabletop as viewed from below |
 |
| Mitered breadboard end with through tenons |
 |
| Open mortise in corner and mortises to receive tenons from table leg |
HongMu style construction is furniture that was designed to satisfy the tastes of the senatorial elites of Chinese society, Mandarins who spent their days practicing calligraphy and watercolors. Today such pieces can be found as centerpieces of
museum collections. And to be frank,
museums are the ideal location for these pieces because such environments represent the refined decors of the households of the Chinese ruling class with innumerable household staff and owners unable to make themselves a sandwich.
I've written about impractical furniture of the top 1% and how such objects can be used as markers for status and ostentatious displays. This furniture construction falls within this category, pretty to look at from a distance, worthy of academic cataloguing, but mostly impractical for the households of the masses with their tendencies to spill and sup.
 |
| cleft tenon from the broken leg |
 |
| Another example of split tenons |
Atop all the legs are tenons which function not just to hold the tabletop down through friction and gravity, but to also keep the butted mitered corners pressed tight. In every example it is possible to see how the lateral forces of the tabletop have cleaved the tenons. Normal seasonal movement of the tabletop was ostensibly ignored in the construction because a design feature that doesn't allow for normal wood movement and due to an
aesthetic feature, simianping 四面平, that doesn't allow for overhang undoes the joinery and leads to further problems from normal daily use.
 |
| My interpretation of a Chinese workman's methods |
 |
| Sawcuts delineating the stub tenons |
Tables that serve for dining receive spills and are wiped down on a daily basis with wet cloths, that is, those that aren't enshrined indefinitely in museums. Liquids get soaked up by end grain more readily than wood surfaces which can be protected to a degree with oils and waxes to repel moisture. It's the wide expanse of end grain of the butted miter joints that provide access for the water to seep into regularly which twist and wrench the joints apart, splitting the tenons from the legs that are intended to hold the tabletop assembly seemingly airtight.
I marked and sawed the tenons at the top of the legs in the same way as the original woodworker, ripping down and then splitting lengthwise and chopping across the weakened fibers. A speedy workman doesn't concern himself with leaving a flawless surface that is hidden, only with removing enough wood to not interfere with the intersection of base and the tabletop; consequently, some of the legs have slight depressions of rent fibers.
Not only does the butt miter allow for absorption of casual liquids, the gap caused from its swelling also further permits liquids to drip down and pool in the end grain of the table leg.
 |
| Split tenon with white rot growth |
I cannot say definitively whether this remoistening of end grain could have caused fungal growth that passed down into the joinery where the leg broke. I can aver, however, that this juncture is the weakest feature of this design. More to come on this project in part 2.