|
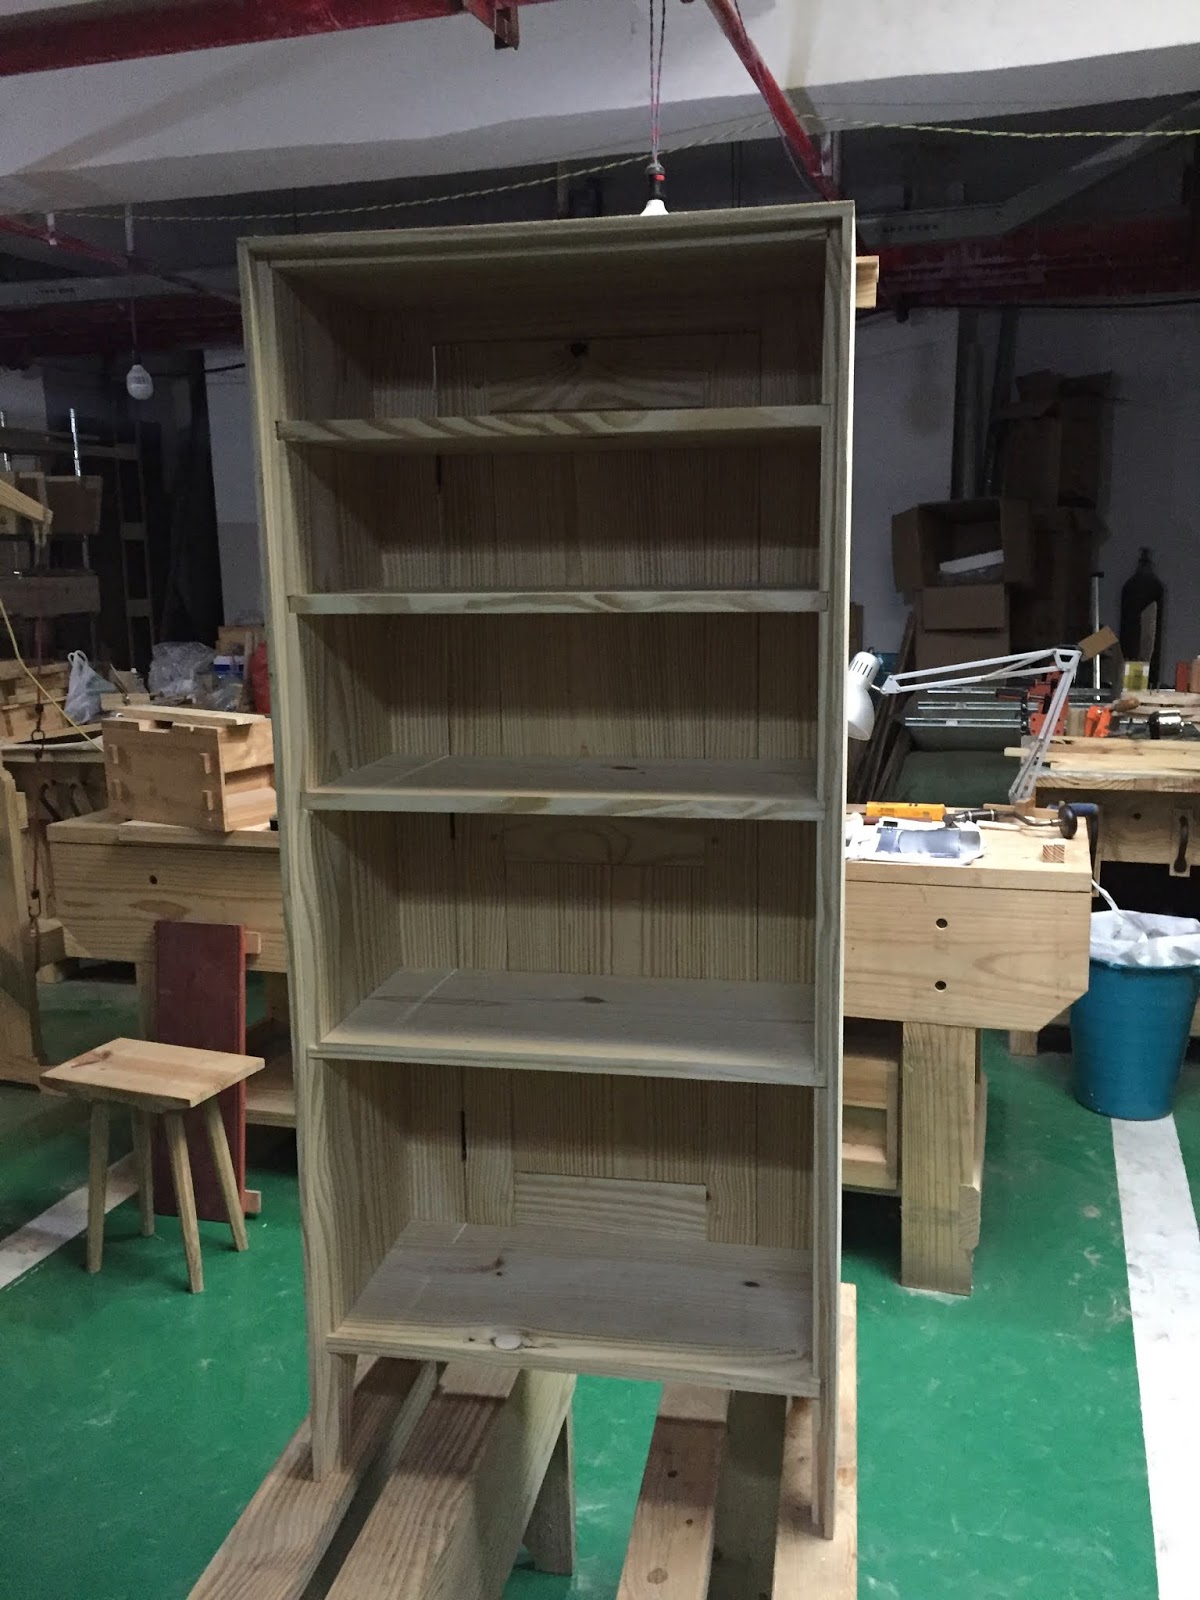
| Iconic state of halted progress |
This project has involved several sources: principally, an
article in PWW written in 2006 by Christopher "
Holy Crap" Schwarz provided me with the most useful construction details and general dimensions, an
article in FWW from 2015 by Matt
'the boxer' Kenney, and season 32 episodes 12-13 in 2012 of the Woodwright's Shop hosted by "Saint Roy" Underhill. Notably I did not directly reference the
book, Shop Drawings of Shaker Furniture by
Ejner Handberg aside from the comments in Schwarz' article and glimpses on the Woodwright's Shop episodes.
This buildout process has prompted me to think more deeply about the distinctions between industrial woodworking and handtool aesthetics as well as what it means to refer to a furniture form as iconic and whether there is much meaning left to the term, Shaker.
 |
| Cornice detail |
Chinese customs agents can arbitrarily decide when a woodworker is buying too many books, but that's only one reason for not having bought the Urtext by Handberg to make this piece. The Schwarz article makes clear that the book itself isn't necessarily helpful where it most matters. It's still not clear how some pencil sketches on repurposed cardboard ended up as published books with so much subsequent influence on American woodworkers. Here is a mystery that remains to be solved. Schwarz elucidates the problems in this matter and then proceeds to explain how he decided on the principal joinery for the piece. He claims to have been able to confirm his construction hunches based on images posted online by the Smithsonian, which is entrusted with the Demming collection. I've tried to track down the same images of the original on the museum website but they appear to have been taken down. He might have seen the pics
here or
here. His comments though highlight that there really are no definitive answers as to how the original cabinet was constructed. There isn't even a satisfying explanation as to the odd shelf spacing although I have my own theory. In this vein, Underhill's program became much more of a helpful guide than the other sources because he wants to recreate the spirit (the handtool methods) of how the piece was made. While I am grateful to having the dimensioned plans in the PWW article, I followed Underhill's advice to follow in the Shaker craftsman's workflow and defined the project with the lumber that is available.
 |
| The two boards that define the other dimensions |
And thus following his sage counsel, I used the 2x12 SPF and SYP that I had on hand. I selected out two relatively knotfree lengths of SPF (patched with tapered plugs) that would be the backboards of the cabinet. They are wedged together by a tongue and groove joint that allows for seasonal movement and the tongue half received a beaded edge to minimize by highlighting this expandable joint. The width of these backboards determines, therefore, by default, the maximum width of the cabinet overall slightly more, potentially, because of the rebate cut into the sides.
I have the impression that the Handberg diagrams simply shows the cabinet assembled with the shelves dadoed into the sides, lacking any details about hardware fixtures or otherwise. Schwarz says as much as he debates the utility of securing the sides with sliding dovetails. He eventually decides that dadoes secured with brads and glue are his best solution. I agree and disagree with his line of thinking. I don't have any prejudices with regards to nails per se in furniture. But I disagree with his reason that nails continue indefinitely to function. He writes:
"There is a snobbery that nails in woodworking are low-class wood-butchery. Don't believe it. If you've inspected much antique furniture, you'll find nails used extensively. But you have to look close. The the nails might be easy to spot in moldings and carcase backs, some of the others are harder to find. Look inside a piece and you might find nails that toenail the shelves or drawer runners to the sides. lots of the interior guts of a piece can be (and were) nailed. It's a fast way to build. The nails will be there if the glue gives way. And the correct nail will wedge the joint tight for decades, maybe centuries..."
Schwarz makes many assertions here that merit comment. First, low class wood-butchery is often defined by misuse of nails. His examples of where one finds nails are some examples, in fact, of low quality furnituremaking e.g 'toenail... drawer runners to the sides." This construction style is often a mark of factory production since the nails are hidden on the interior away from the mindful eyes of consumers. Most annoyingly, Schwarz makes no distinction between mass produced and handcrafted antiques in his support for nails. I have examined many examples of antique furniture under repair and one point I can stress is that not all nails found in furniture were put there originally both from factory and individually produced pieces. Not every discovered nail is, therefore, evidence of nail usage by the maker. The most encouraging part of Schwarz' thinking process is that he intends his furniture to last decades or longer. Yet as every furniture repairman knows, furniture lasts a century not because it is made indestructible but is made in order to be easily repaired. The use of brads in moldings allows for it to be gently pulled away from from the carcase with a puttyknife and patience, simplifying predictable repairs. This happens only because the original piece was constructed in a manner that allowed for ease of repairs. This explains why it is easy to spot nails in molding upon close inspection. A futureminded craftsman wants a repairman to find them!
 |
| Full-size drawing from the Schwarz article |
 |
| Checking the beads against the plans |
 |
| Bulk waste removed before planing and scraping |
 |
| Astragals before rabbeting and gluing to cove and bead section |
 |
| Ripsaw cuts to remove waste |
 |
| Early mockup |
 |
| Rabbet (as per Schwarz) and relief cut to simplify fitting of cornice |
 |
| Completed molding section |
This makes his comment about nails holding after glue has failed rather distressing. A failed gluejoint originally reinforced with nails likely invites a handyman with a hammer, usually somebody's brotherinlaw or a cheapskate retiree, decides that a piece of furniture only needs a few more nails to put it all right lickety-split. Schwarz gives a very mixed message in this regard, writing later in the article:
"Then take everything apart and reassemble with glue. Although this isn't particularly complex assembly, I would choose a slow-setting glue (Such as Titebond Extend) or perhaps a liquid hide glue (such as Old Brown Glue), which is both slow-setting and reversible with heat and water. You could also a polyurethane glue, which sets slowly, but there can be some foamy-squeeze-out problems if you're not an experienced user of this product."
This list of adhesives suggests that any of these three can equally contribute to constructing a piece of furniture with the potential to last a century. It's only the reversibility of the animal protein glue that makes it possible to repair a piece with minimal intrusion. The hidden nails that Schwarz insists on adding to the dadoes are not only more difficult to spot but much more damaging to extract than headed nails driven from the outside of the carcase, which he advises in a later book. I don't suggest that his method of using a gimlet to prebore the holes for nails is wrong or ahistoric, but hiding nails on the interior with a nailgun is a method that industrial furniture manufactures perform routinely, too. Despite using more handtools than Kenney ever considers in his later reinterpretation, Schwarz does appear to be following the guidelines for an industrial manufacturer, which are not at all aligned with the original celibate woodworker.
 |
| Backboards removed: shelf spacing |
After rereading the PWW article, I decided that I need to rethink his approach. I wanted this cabinet to be built along the same set of compromises and aesthetic concerns as are represented in the original. This calls into question what it means to make Shaker furniture in a postindustrial world, especially one in which most people have only ever interacted with, if at all, modern factorymade reproductions of Shaker pieces. with varying degrees of fidelity to the originals. 21st century woodworkers are much more likely to be making copies of reproductions of Shaker originals. While the general appeal of furniture styles can wax and wane with other fashion trends, I think I can explain the present day appeal of the Shaker aesthetic.
First the minimal decorative elements and boxy forms appeal to modern woodworkers who have centered the tablesaw in their workshop. This is not a recent development but a trend that has been building up so that today it's possible to buy mass produced Shaker style pegs for any project that requires them. A weekend woodworker can feel reasonably confident that he can complete a project that looks good enough to justify to his wife why she is unable to park her minivan into their two-car garage.
There is also a sense that Shaker is an American (Unitedstater) form that rejected European extravagance while celebrating Yankee utilitarianism. As usual, there is a modicum of truth to many legends. Lastly, I think that Shaker style furniture as it has been redefined by manufacturers is easy for them to produce and for consumers to identify regardless of how closely it resembles the originals. More recently, it fits in nicely with the Real! Wood movement since the Shakers used only real wood from real trees and they tended to use natural figure as decorative highlights The fact that they also loved bright primary colors has conveniently been overlooked, at least, until instant milk paints started showing up in the market. Besides most of the photographs of original dwellings are in black and white so it's rather common to forget that anything was brightly painted until RCA began selling color TVs.
Complicating this discussion is the long length of the Shaker era, which bridged industrialization in the USA. It might be helpful if more is made of the distinctions between domestic and commercial Shaker pieces; and handmade and industrially produced items. I have not yet come up with a satisfying term for the distinction between original Shaker pieces and modernized, simplified versions. Perhaps industrialized Shaker, NeoShaker, or Normite Shaker?
I cannot return to the local timber stands that an anonymous cabinetmaker in Enfield drew his primary materials from to source my lumber. He used local because that is mostly all he could procure. I use construction grade SPF and SYP because, in the same spirit, that is what I can readily procure. Underhill stresses the importance of finding high quality, dense white pine, calling SPF marshmallow wood. I decided that SYP would do better for construction of the casework. It's a compromise but I feel more confident that the end grain certainly wears better for the feet than SPF among other factors. Neither Schwarz nor Kenney explain their decisions to use Cherry and Maple respectively for their cabinets. Kenney mentions that the cupboard's intended use is for his wife's sewing notions. I doubt that her pastime demands a more durable case than a jelly jar cabinet. I certainly hope that their decisions didn't involve antiPine snobbery!
 |
| Balancing the side to transfer the the tails |
 |
| Moxon vise |
 |
| I seldom use a coping saw on smaller stock |
 |
| Dryfitting |
My own construction details of the carcase joinery came about because I didn't look at the plans of Schwarz very carefully. I think I would have used halfblind dovetails at the top corners because that seems what the piece calls for. The detailed description of the dovetail jig and setup in the Kenney article might have convinced me that all three woodworkers did the same. Schwarz rejected sliding dovetail between the shelves and the case sides as too great a challenge. But he assumes that all shelves must employ the same joinery option. I believe that I fell upon a better solution.
 |
| Single sided dovetail |
 |
| Tapered sliding dovetail joint |
I decided to do only one shelf with a sliding tapered dovetail joint. This along with other features can provide sufficient strength for keeping the sides linked together and square. Then during glueup I would only attempt to glue this shelf, the halfblind dovetails, and two other shelves with plain dadoes. These four horizontal components would assure that I could clamp up the assembly square. With glue dried and the clamps removed, It might seem counterintuitive but a tapered sliding dovetail is easier
to construct than a straight one. The layout requires a bit more
attention but the final fitting involves less potential for screwups. I then fettled and slid the last two uppermost shelves into place snugly, applying hide glue only at the front of the joint.
 |
| Dado joints |
To keep the layout simple, I set the depth of the dadoes with a marking gauge to be the same as the amount of material that is removed from the tailboard sides. I then could use the inside marks of the top to define the width of the shelves.
 |
| Making do with 2x10 stock |
One other detail that merits mention is in the depth of the shelving boards. The upper shelves are cut to the same width as that of the measurement from the front to the rabbet of the sides. The two lowermost shelves, however, are wide enough to engage into dadoes cut into the back boards. I doubt much but these might afford a modicum of additional support to the lower shelves. Ideally, the heaviest items for storage ought to be placed here. The principal benefit is that these dadoes prevent racking of the carcase. The backboards will eventually be nailed in place after *spoiler alert* the rest has been painted with nails driven in the rabbet recess above and below the shelves and a short distance from the sides into the shelves and through the dadoes. This arrangement creates a triangular nail pattern, bracing against horizontal forces while still allowing the backboards to expand and contract across the tongue and groove joint.
 |
| Spacer block in action |
Then it follows to apply the faceframe to the carcase. Schwarz here makes a very useful suggestion. I cut a spacer block at the same time as I cut the shoulders of the tenons on the top rail. This piece is useful during glueup of the frame to keep the vertical pieces parallel and also to maintain alignment when nailing the frame to the carcase.
 |
| Faceframe glued and clamped |
 |
| Making plugs |
 |
| Predrilled prior to gluiing |
 |
| Nailed and plugged |
I first clamped the faceframe in place, anticipating a bit of overhang. I then drilled the pilotholes for the Tremont finishing nails. Setting the nails into these holes, I spread glue and was able to reapply the faceframe into the holes and then to nail quickly, obviating the need for as many clamps.
I set the nailheads about an 1/8" below the surface with a pinpunch which left a round hole ready to receive the wooden plugs, which I sharpened just enough to create a snug fit that, consequently, are held in place with hide glue.
 |
| Planing off the excess wood and adding chamfers |
I decided against running a bead up along the front to corners. I don't like seeing a bead run under a cornice. This creates an unsatisfying visual conjunction; instead, I put a chamfer along the lengths and allowed it to taper off just below the cornice.
The next step is making and hanging the paneled door. The frame is standard; the distinction lies in the beaded panels. I certainly don't know enough about furniture of this period to say whether this was a common feature or an innovation. The challenge in creating this bead is highlighted by the fact that only Underhill bothers to mention it. His suggested technique is to use a sharpened flat head screw secured in a block of wood that acts as a fence. I've used this technique in the past and it does work fairly well but in this situation, the sharpened screw cutter must span the gap that fits into the frame.
 |
| learning curve on display |
The inherent problems Underhill's stickandscrew device compelled me to work out a method of my own. I based the dimensions of the bead on a cutter from a LN beading plane. I then used a cutting gauge to cut two parallel lines that define the groove. The bulk of the waste was chopped out with chisels to avoid crossgrain tearout. Some deft paring work then rounded the sides of the beaded, the contour of which was refined with cutter held in hand, paying attention to the slope of grain.
 |
| Sloping right; sloping left |
 |
| Maple plugs tapped from the door back |
Although I did not peg the faceframe, I decided to try a new method of pegging on the door. Once again the discontinued
Plugger was called into service. I glued the frame first and then predrilled with 2mm drills. I then used the Plugger on the interior surface, pressing until the tip just poked through the front. Tapered pegs are, in fact, are easier to drive home in this manner. There is certainly no danger of splitting out fibers on the show surface. In the case there is a need for repairs, removing such pegs is equally simpler. The obvious benefit is that there is minimal end grain on the front surface.
 |
| poking through |
 |
| Sawn flush |
I pause here in the build to consider what makes the Enfield cupboard iconic and renders it distinctive from other small cupboards. Despite the popularity of this piece, there is truly no fully detailed description of it to create an objectively accurate reproduction. Schwarz confirms this suspicion. The Smithsonian, as well as I have been able to assess, has never published interior photos of it, nor allowed knowledgeable woodworkers to examine its construction details. I cannot even say whether it has ever been publicly displayed there. The principal source of information is the publication based on a Danish furniture repairman's working sketches, which as Schwarz unironically writes, were done "Sometime in the 20th century...". I have not been able to track down any more information about the genesis of this publication. Given all the questions raised by the the source material and its delayed publication, it is safe to say that the Handberg drawings cannot be considered definitive. Ejner Handberg was laid to rest in 1985 but the original cupboard is behind the walls of the Smithsonian.
 |
| Chopped endgrain before sawing the leg profiles |
And so we must consider what elements make a cupboard an Enfield cupboard as we presently understand it. I think one notable feature is its size. Its dimensions make it functional and yet not so large that it can overwhelm a small space. It has simple, straight lines but it is not devoid of decoration. The cornice molding, therefore, is a distinctive element, which, as Underhill points out, is essential to concealing its joinery. Lastly, I think the door construction also defines this piece as what it is. The simplicity of the all wood pull and turnknob are essential for me. The threesided faceframe also is de rigueur. I also believe that the beaded panels fall into this category. The doorframe is made quite light with stock that is too thin to support beads, which for aesthetic reasons then are moved to the panel. I think the linear emphasis is undeniable in the original's appeal.
More research is warranted to better understand beaded panels. I still haven't determined the best method for this nor has anybody proposed the method how the original was cut. The closest that I can compare this with is purfling and I thus wonder whether a specialized tool was similarly used to create the perimeter groove in the original.
 |
| Simpler method of dovetail layout |
 |
| Improved dovetail layout accommodating the back rabbet |
Other features seem adaptable to today's woodworker. Pine is used in the original and I think this material, carefully selected, is more than adequate and lends itself malleable to the crown molding and beaded panel details. I suspect that the original cabinetmaker wanted a lightweight cupboard from a material that would work readily with handtools. The decision by modern woodworkers to use hardwoods seems to be a function of the ease of planing wide boards speedily and effortlessly with electric surface planers. Perhaps even more to the point, however, is the perception that pine is not worthy of handmade items, especially for items that are intended to command a high enough price to justify the labor costs. It's hard to discern the real motives behind such hardwood preferences. Wood selection is certainly the primary concern in China. I speculate that Schwarz' choice of Cherry says more about what his customer expected. I don't know why Kenney chose maple any more than I can fathom why he installed a drawer that wasted so much interior space with the drawer addition. In writing this essay, it's become evident that Kenney's article for FWW guided me the least in my own build. Visually his cupboard shows the least similarity with the original and the greatest amount of industrial aesthetics. At best, his cupboard is about the same size as the Enfield cupboard. And yet, it was the title of his piece:
The Enflield Cupboard, Updated; An iconic Shaker cabinet gets a face-lift
which set me to pondering how any piece gets labeled iconic and how then its iconic features can be so casually
downplayed. I think it's fair to say that Kenney's reinterpretation drifted the farthest from a Shaker preindustrial spirit as FWW has drifted from the editorial focus of the f
irst issue.
 |
| Knots determine application |
Lastly, there is the matter of the odd shelf spacing, which I deem more of a quirk than a feature. It certainly remains a riddle that is never to be answered without the interest of equally curious curators. I have a theory that the shelf spacing was determined by the positioning of knots and difficult grain, but until the Smithsonian publishes the interior details, it shall remain just a theory.
 |
| Packed for indefinite storage |
 |
| Bundled until further notice |
I had intended to publish this weblog posting with photos of the completed piece in its intended location, but then the fickle finger of fate intervened. The woodshop was deemed too dangerous by security authorities after two years of operation. We were ordered to vacate the parking garage with two weeks' warning. Briefly a nearby unused four storey residence was offered as a consolation at a reasonable rent, but it was withdrawn shortly afterwards. The woodshop chief has relocated into a four stall garage and I have moved my equipment, materials, and uncompleted projects into the house of a former student sympathetic to my circumstances. So I'm in the lurch as to my next move. Updates to follow.
 |
| A very unfinished mansion |
 |
| Putative woodshop for a day |
During the transition period, I was compelled to dispose of two sacks of accumulated scrap pieces. This was done by dumping them in a designated tip area located on the apartment complex grounds. I happened to catch sight of a sidetable that was left there to be carted away with the rest of the construction rubble. If I had spotted this same piece a few months earlier, I would have rescued it, repaired it to the best of my abilities, and after studying it, I would have written up a weblog posting here and postponed all that I have written hereabove. Feeling defeated and exhausted, I saw this piece as a portent. It's possible that there are not enough middle class Chinese yet who appreciate handmade furniture.
 |
| Replaced by Ikea |
 |
| Handicraft landfill |
Zhongqiujie kuaile!